Deck 36: Sketching Irregular Shapes
Full screen (f)
Question
Question
Question
 What is step 1 of sketching an irregular shape, as shown in the accompanying figure?
A) Draw the arcs.
B) Lay out the basic rectangles.
C) Draw the center line.
D) Draw the squares.
Question
Question
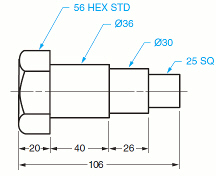
 The shaft support shown in the accompanying figure is an example of a machine part that can be sketched easily by ____.
A) reduction
B) blocking
C) estimating
D) inversion
Question
 What is step 2 of sketching an irregular shape, as shown in the accompanying figure?
A) Draw the arcs.
B) Lay out the basic rectangles.
C) Draw the center line.
D) Draw the squares.
Question
 What is step 5 of sketching an irregular shape, as shown in the accompanying figure?
A) Draw the arcs.
B) Lay out the basic rectangles.
C) Draw the center line.
D) Draw the squares.
Question
 What is step 4 of sketching an irregular shape, as shown in the accompanying figure?
A) Draw the arcs.
B) Lay out the basic rectangles.
C) Draw the center line.
D) Draw the squares.

Unlock Deck
Sign up to unlock the cards in this deck!
Unlock Deck
Unlock Deck
1/8
Play
Full screen (f)
Deck 36: Sketching Irregular Shapes
1
Discuss how to sketch irregular shapes.
Parts that are irregular in shape often look complicated to sketch. However, the object may be drawn easily if it is first visualized as a series of square and rectangular blocks. Then, by using straight, slant, and curved lines in combination with each other, it is possible to draw the squares and rectangles in the exact shape of the part.
2
List the steps in sketching an irregularly shaped part.
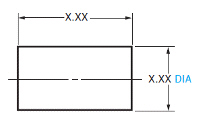
STEP 1 Lay out the two basic rectangles required for the shaft support. Use light lines and draw the outline to the desired overall sketch size.
STEP 2 Place a dot at the center of the top horizontal line and draw the vertical center line. Also, draw two vertical lines for the sides of the top rectangle.
STEP 3 Locate dots and draw horizontal lines from the left vertical line to locate:
A. The rectangle for the top of the support
B. The center line of the hole
STEP 4 Draw the squares for the rounded corners of the base, top, and the center hole. In these squares:
A. Draw the diagonals and form the triangles.
B. Locate dots in the centers of the triangles through which each arc will pass.
STEP 5 Draw the arcs and circle. Start at one diagonal and draw the arc through the dot to the next diagonal. Continue until the circle is completed.
STEP 6 Draw the side view if necessary.
STEP 7 Darken all object lines and dimension. Erase those lines used in construction that either do not simplify the sketch or are not required to interpret the sketch quickly and accurately.
3
What is step 1 of sketching an irregular shape, as shown in the accompanying figure?A) Draw the arcs.
B) Lay out the basic rectangles.
C) Draw the center line.
D) Draw the squares.
B
4
Describe sketching by blocking.
Unlock Deck
Unlock for access to all 8 flashcards in this deck.
Unlock Deck
k this deck
5
The shaft support shown in the accompanying figure is an example of a machine part that can be sketched easily by ____.A) reduction
B) blocking
C) estimating
D) inversion
Unlock Deck
Unlock for access to all 8 flashcards in this deck.
Unlock Deck
k this deck
6
What is step 2 of sketching an irregular shape, as shown in the accompanying figure?A) Draw the arcs.
B) Lay out the basic rectangles.
C) Draw the center line.
D) Draw the squares.
Unlock Deck
Unlock for access to all 8 flashcards in this deck.
Unlock Deck
k this deck
7
What is step 5 of sketching an irregular shape, as shown in the accompanying figure?A) Draw the arcs.
B) Lay out the basic rectangles.
C) Draw the center line.
D) Draw the squares.
Unlock Deck
Unlock for access to all 8 flashcards in this deck.
Unlock Deck
k this deck
8
What is step 4 of sketching an irregular shape, as shown in the accompanying figure?A) Draw the arcs.
B) Lay out the basic rectangles.
C) Draw the center line.
D) Draw the squares.
Unlock Deck
Unlock for access to all 8 flashcards in this deck.
Unlock Deck
k this deck
Unlock Deck
Unlock for access to all 8 flashcards in this deck.